A couple of weeks ago I went by to check on a project where we were installing vinyl replacement windows. The homeowner shared that his pest control technician had told him that he had a lot of moisture under his house. I said, “Let me guess… he recommended that you hire them to install dehumidifiers.” He confirmed and I told him that most pest control company’s realize that the homeowner is not likely to go into the crawl space and it is their technicians that usually report moisture or leaks under a home and that gives the pest control company a lot of leads in a completely different area than their area of expertise…killing bugs and vermin. They have a captive audience and charge a LOT of money to do it. Installing dehumidifiers is not a service where you can pick up the phone book and look up dehumidifier installation.
He asked me to ballpark the cost to install dehumidifiers under his house. I told him that for his size home I would install two units that can purchased at any home improvement store and would handle the plumbing to install a drain to the outside. I explained that an electrician would need to come in to add an electrical outlet for the unit as well and that was about it. The price I gave him was half the estimate given by the pest control company. Once I gave him my opinion on the cost, I changed the subject to what was causing the water under his home and that he should consider addressing the root cause of the moisture not just the resulting high moisture levels caused by water seeping into his crawlspace.
[su_note note_color=”#86858f” text_color=”#1811ed”]There are three key things you can do to “prevent” moisture in your crawl space- besides just remove it once it’s already there:[/su_note]
1-If you are building a home especially in an area that does not drain well insist that the contractor add sand inside of the foundation so that the ground level inside the foundation is higher than the ground level on the outside of the home. Ideally the sand or ground inside the foundation should be higher than the flower beds created outside the foundation. The external grade should have a negative slope away from the foundation meeting building code regulations.
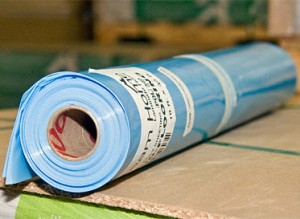
2-Install a moisture barrier – minimum of 6 mil polyethylene vapor retarder – Below is the current building code requirement approved in March of 2013, however homes built several years ago may not have moisture barriers, have a barrier that is less than 6 mil or not have full moisture barrier coverage.
R408.2 Ground vapor retarder.
When required by Section R408.1.1 Exception, a A minimum 6-mil (0 15 mm) polyethylene vapor retarder or equivalent shall be installed to nominally cover all exposed earth in the crawl space with joints lapped not less than 12 inches (305 mm). Where there is no evidence that the ground water table can rise to within 6 inches (152 mm) of the floor of the crawl space it is acceptable to puncture the ground vapor retarder at low spots to prevent water puddles from forming on top of the vapor retarder due to condensation. Crawl space drains shall be kept separate from roof gutter drain systems and foundation perimeter drains.
The effective date is June 1, 2013
3- Properly installed gutters, downspouts and leader pipes – If your yard is negatively sloped away from the house at least six inches within first 10 feet and the foundation is still damp or wet then adding gutters is essential. Gutters handle the water coming off the roof and when installed properly then the water is directed away from the foundation.
Rainwater must be diverted away from the building foundation and gutters and downspouts are a key tool in preventing foundation problems. Without gutters the amount of water that is dumped onto your foundation can cause foundation wall failure or cracked foundation and wall joints not to mention mold and mildew.
Back to my homeowner story…. I told him that he could install dehumidifiers under his home but even the best dehumidifier may not work effectively if too much outside moisture seeps into the crawlspace. I suggested as a first preventive step to install gutters and ensure the crawlspace had a proper moisture barrier. Then if that does not remedy the moisture level he should pursue a dehumidifier.
The homeowner felt my recommendation made sense and he said that the pest control technician never mentioned how to prevent the moisture from accumulating under the house just how to remove it. He said he would rather prevent the problem so he asked me to install gutters and downspouts with extensions on his home.
For those of you who have gutters you should check to make sure the gutters aren’t clogged and that downspouts are directing rainwater at least 3 feet away from the house. Grade your property so that rainwater flows away from the foundation. Other ideas to remove moisture in your home are: keep the duct for your clothes dryer properly vented to the outside, make sure that it isn’t clogged or leaking, run an exhaust fan or open a window when showering, and squeegee or wipe down shower walls afterward. When cooking, use a range hood or exhaust fan that vents outdoors.
It makes me feel good when I am able to help a homeowner prevent future problems. If I can do the same for you just give me a call.
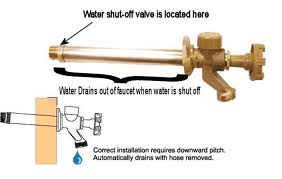
 This diagram demonstrates how it is supposed to work. If a homeowner leaves a hose or timer attached to the hose bib over the winter it prevents the water from draining out of the pipe and when that water freezes it causes the pipe to split. Since the outside faucet is normally not used over the winter it isn’t until Spring when the bib is turned on that there will likely be a leak under the house. Fortunately this homeowner recognized an issue immediately before any damage was done. If the leak is not detected, the amount of water pouring out under the house, can cause moisture problems and high water bills.


